When it comes to outdoor tiling, balcony waterproofing is not just an extra step — it’s essential. At Bell Asphalt Co., we’ve seen too many beautiful balconies suffer from water damage due to skipped or poorly done waterproofing. If you’re getting ready to tile your balcony, this step-by-step guide will help you do it right from the start. Learn how to properly waterproof your balcony before tiling to prevent costly repairs and enjoy a durable, long-lasting finish.
Understand Why Balcony Waterproofing Matters
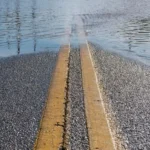
Balconies are constantly exposed to rain, humidity, and temperature changes. Without proper waterproofing, water can seep into the structure, leading to leaks, mold growth, and even serious structural damage. A quality waterproofing system creates a strong, protective barrier that extends the life of both your balcony and your tiles.
Pro Tip from Bell Asphalt Co.:
“Preventing water damage is always more affordable than repairing it!”
Prepare the Balcony Surface Thoroughly
Before you apply any waterproofing, make sure the balcony surface is clean and sound. Remove debris, dust, and any remnants of old sealant. Fill cracks and holes with the appropriate filler. The surface needs to be smooth, dry, and solid for the waterproofing membrane to bond effectively.
Why preparation matters:
A well-prepared surface helps the waterproofing layer adhere properly and ensures long-term performance.
ALSO READ: How to Create a Gallery Wall on a Budget
Select the Right Waterproofing System
Choosing the correct waterproofing method is crucial for success. Consider these popular options:
- Liquid membrane systems: Easy application, excellent flexibility.
- Sheet membranes: Highly durable, perfect for larger balconies.
- Cementitious coatings: Great for moisture resistance and longevity.
Bell Asphalt Co. recommends:
For balconies exposed to changing weather, liquid membrane systems provide outstanding flexibility and robust protection.
Apply the Waterproofing Membrane Carefully
Follow the manufacturer’s guidelines closely. Typically, this process involves:
- Applying a primer to promote adhesion
- Evenly rolling or brushing on the membrane
- Using multiple coats for maximum strength
- Giving special attention to corners, edges, and joints
Tip:
Allow each layer to fully cure before applying the next one. Patience here pays off in long-term protection.
Seal Joints, Corners, and Edges
Vulnerable areas like joints, corners, and around drains are common leakage points. Use high-quality waterproof sealants to secure these spots and prevent future water ingress.
Test the Waterproofing Before Tiling
Before you start tiling, perform a water ponding test. Slightly flood the surface with water and check for leaks or weak spots. Address any issues now — it’s much easier than fixing problems after the tiles are installed!
ALSO READ: Weekend Projects to Refresh Your Home
Start Tiling on a Properly Waterproofed Surface
Once you’ve confirmed the waterproofing is solid, you’re ready to tile! Use tile adhesives that are compatible with waterproofed surfaces to ensure strong adhesion and long-term durability.
Conclusion
Waterproofing your balcony before tiling is a smart investment that protects your home and enhances the life of your outdoor space. With the right preparation and materials, you’ll enjoy a stunning, durable balcony for years to come.